Modding:Translations
Adding translations to your mod
Translations provide ways for users who are not native in your language to also enjoy your mod. Even if you don’t write the translations yourself, taking the steps to set them up will be extremely useful if someone else wants to translate your mod.
This tutorial will teach you:
- The format used by Godot to import translations;
- How to write your translations using free software;
- How to import your translations in Godot and add them to your mod’s metadata;
- How to actually use your translations;
- Best practices regarding translations.
Godot translation format
Godot expects you to write translations in a table format, like so:
| keys | en | fr |
| RECORD_MONSTER | Record that monster! | Enregistre ce monstre ! |
| FLEE_FIGHT | Flee the fight... | Fuir le combat... |
On the first column are translation keys. They are the bits of text that identify a single translation text across all languages. They are never shown to the player, only to developers.
The other columns are translations for these keys, in the language indicated on the first line. "en" means English, while "fr" means French. You can have many columns, one for each language used by the game. You can find the list of all supported languages on this Godot Engine docs page.
Godot expects all of this to be in a CSV file, which is a format commonly used to share table data. We'll see how to create this CSV file in the next section.
Writing your translations
In this tutorial, we’re going to use LibreOffice Calc as it is a free, easy-to-use software for this task. Other softwares (including notepad) can achieve this job.
Here is what your Calc sheet should look like:
You can then click File > Save as…, browse to your mod’s folder to save the file while making sure to select the CSV format:
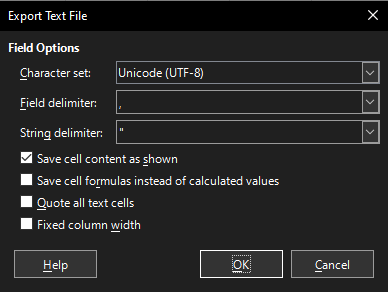
Make sure to confirm that you are saving in CSV, using the following parameters:
Your translation CSV is ready, now it's time to import it into Godot!
Plugging things together
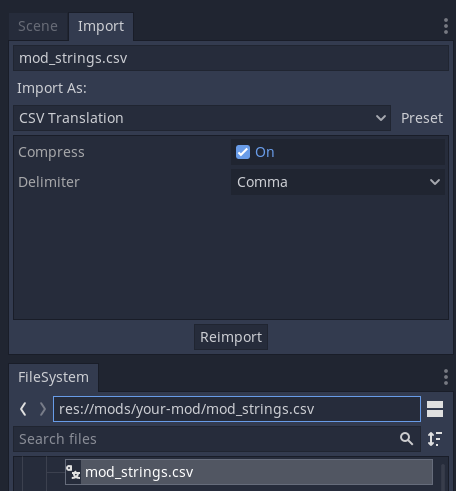
Your file should appear automatically in Godot. In the editor, click on your CSV file, then on the “Import” tab atop the screen:
Make sure that the settings are identical to the screenshot. If for some reason they were different, you can fix them and then click ReImport. Godot should have already imported the translations, so you’ll see a couple new files in your mod folder. Each file is a new translation resource that the engine can use.
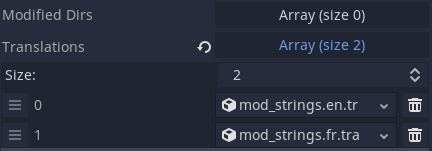
We’re almost done: in your metadata.tres file, add each of your translation resource to the Translations array. You can do so by drag-and-drop, the end result should look like this:
Note that the order doesn't matter here.
Using your translations
Your translations are ready and loaded, all that is left now is to actually use them. This is the easy step!
In resources and other nodes, wherever you would normally write text to be displayed to the user, write a translation key.
So, instead of writing “Let’s go catch that monster!” in a dialogue Node, you would instead write “GO_CATCH_MONSTER” and the engine will make sure to display the correct translation based on the user language.
If you need to use your translations in GDScript code, you can use tr("GO_CATCH_MONSTER").
Best practices
- Make sure to prefix your keys with your mod name. For example, instead of GO_CATCH_MONSTER, write MODNAME_GO_CATCH_MONSTER. This makes sure that no key conflict happens when multiple mods are installed, which would cause the wrong translation to appear.
- Even if you only create your mod in a single language, do add a translation file. This will make sure that future contributors can easily add new languages to your mod, without having to rewrite most of your nodes and code to add the keys everywhere.
- Translation keys should always be in English, preferably in what's called SCREAMING_SNAKE_CASE (all in CAPS, with underscores
_separating the words). - Cassette Beasts is aimed at a broad public, including sensitive and underage people. Keep this in mind when writing your mods!


