Modding:Monster Making Guide Part 2
This article is part of a series of tutorials intended on teaching the reader how to create their own monster mods for the PC versions of Cassette Beasts. We advise the reader familiarise themselves with the Mod Developer Guide first.
This part will explain how to set up a monster's fusion form.
- Monster Making Guide Part 1: Concept, Art & Animation
- Monster Making Guide Part 2: Fusion Forms
- Monster Making Guide Part 3: Integration & Implementation
Downloadable project files for this section:
- Example .ase file for Fusion form head/helmet parts - Requires Aseprite/LibreSprite
- Example .ase file for Fusion form body parts - Requires Aseprite/LibreSprite
- Example .ase file for Fusion form arm parts - Requires Aseprite/LibreSprite
- Example .ase file for Fusion form leg parts - Requires Aseprite/LibreSprite
- Example .ase file for Fusion form tail parts - Requires Aseprite/LibreSprite
Step 1: Understanding Fusion Forms
First it is important to understand how "fusion" works in the game engine for Cassette Beasts. Every monster has a fusion config file - a 2D Godot scene file (.tscn) that defines several "parts" and also co-ordinates associated with those parts. When two monster forms fuse in-game, the config for the primary monster is used as a base, but swaps "parts" with the secondary monster's fusion config scene to create a mashup of the two scenes. Finally, the colour palette of this form is created by pulling palette information from both monsters (which will be explained in Part 3).
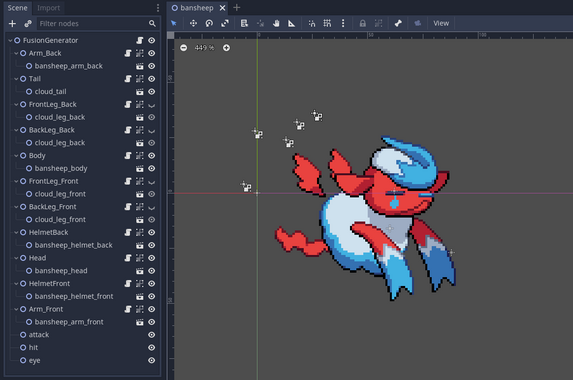
What the fusion form scene looks like for Bansheep in the editor (click to expand)

These parts are defined by nodes, that then have sprites nested within them. If a fusion form doesn't need to display a part (for example, Bansheep's fusion form does not feature legs) then those layers can be hidden in the editor and will not appear on this fusion form. The sprites defined for it, however, can still be used if this monster is the secondary monster in a fusion.
The list of "parts" that must be defined are:
- Body: The fusion form's body. This never swaps, and is always defined by the primary form in a fusion. Should never be hidden.
- Head: The fusion form's head. This is always drawn in roughly the same size so that the "helmet" fits on it without clipping - and mostly round. Should never be hidden.
- HelmetFront & HelmetBack: This is for external details that go over the head - ears, hats, horns, hair, etc. When two different monster species' are fused, the engine will always use the "head" from one and the "helmet" from the other. The "HelmetFront" sprite is for parts that go in front of the head (such as the foreground ear + hair in the above Bansheep example) and the "HelmetBack" sprite goes behind (the background ear for the above example). Should never be hidden.
- Arm_Back & Arm_Front: The fusion form's "arms". Can be hidden for fusion forms that don't have visible arms (such as Traffikrab)
- Tail: The fusion form's tail. Can be hidden.
- BackLeg_Front & BackLeg_Back: The hind legs of a fusion form. If a monster is bipedal (only has two legs) then these should be the legs used. Can be hidden.
- FrontLeg_Front & FrontLeg_Back: The front legs of a fusion form. Can be hidden.
And the list of the co-ordinate nodes that must be placed are:
- attack: This marks the point where attacks "emit" from - and is usually lined up in front of the arms (if the monster has arms) or the "mouth". These don't have to be exactly accurate but it helps.
- hit: Where the "impact" sprite animation will appear when attacked. Generally placed in the front-center mass of the body.
- eye: Some attacks play an animation on a monster's eye (such as Revenge Strike) - this defines where that happens on a fusion form. The eye of the fusion can differ from this placement if the secondary monster's head is used, but don't worry too much about it.
You'll notice that the fusion parts are all in the same three colours! As stated earlier, the palette for the fusion form in-game is pulled from the two monsters that formed it, so all fusion parts are drawn with three colours that are used as follows:
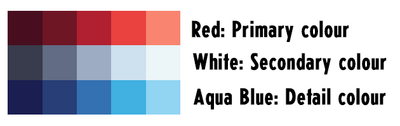
The three colours used for fusion parts (click to expand)

Whilst you don't have to stick to these three colours, other palettes used on the fusion parts will not change colour.
Step 2: Custom Fusion Parts
We can make custom fusion parts using the templates available at the top of this page. Opening one of the template files in Aseprite/Libresprite, you'll see something like this.
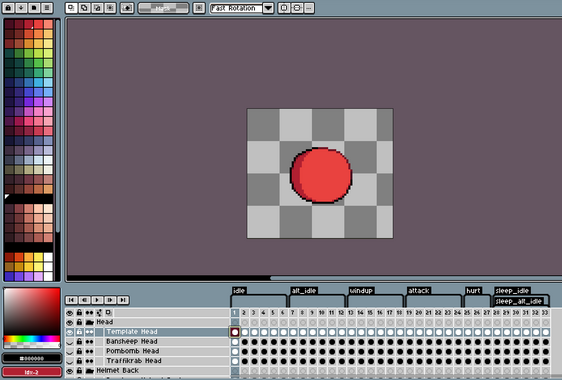
The head/helmet template open in Aseprite (click to expand)

You can see in the above image that Fusion parts have the same animation tags as regular monsters - after all, fusion forms can do anything a regular monster can do! You'll also notice that all the animations are 6 frames long (except for "hurt", which is 3) which keeps all the parts animating in sync with each other.
So let's get designing!
Heads & Helmets
As explained earlier, the "head" is a round sprite that is always broadly the same shape - the round blob that is given as a template in the Template files. You can change the shape of the head slightly, but you'll want to limit how drastically you change it so that it doesn't clip with the "helmet" layers.
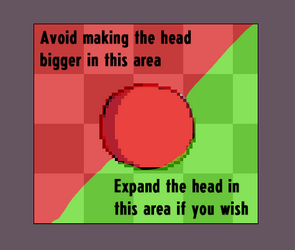
This shows, roughly, where you are safe to adjust the size of the template head for custom fusion parts

Let's sketch a head for Wraithand using this template head. The only feature on its head is its face, which makes this quite straightforward.
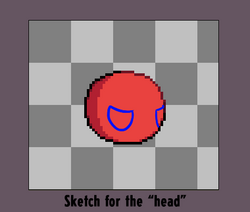
A quick sketch to plan the "head" part
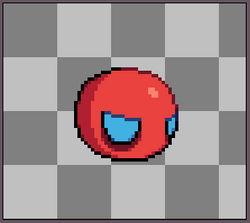
The finished sprite


Now let's do the same thing for the "helmet" part. This always has a "helmet_front" layer, but can also have a "helmet_back" layer for any elements that you might want to display "behind" the head (for example, an ear). For now, we'll adapt Wraithand's quiff into a helmet sprite that just uses the "helmet_front" layer.
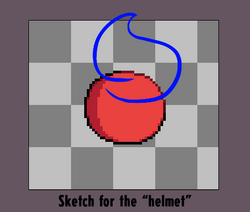
A quick sketch to plan the "helmet" part
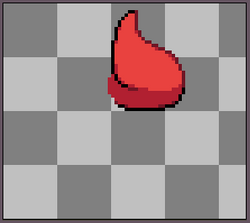
The finished sprite


Together, both layers will look something like this!
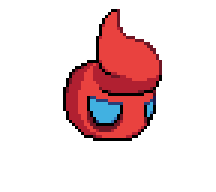
Both the "head" and "helmet" sprites animated together
