Difference between revisions of "Modding:Monster Making Guide Part 1"
| Line 123: | Line 123: | ||
</gallery> | </gallery> | ||
| − | === World Sprite === | + | === World Sprite (Optional) === |
| + | |||
| + | |||
| + | <gallery widths=208px heights=96px> | ||
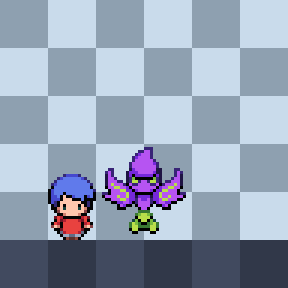
| + | File:CB sprite scale size world.png|A comparison of various world sprites for Cassette Beasts (click to expand) | ||
| + | </gallery>If you want to also design a roaming world monster to add into the game, the process is a lot simpler than the battle sprites! Of course, not every monster in Cassette Beasts has a "world sprite" so this isn't necessary. | ||
| + | |||
| + | ==== 1: Outline and Size ==== | ||
| + | '''As a rule, the "world sprites" are roughly 50% of the scale of battle sprites''' - you can get a good indication of how big a monster's world sprite should be by shrinking its battle sprite down by half (which we have done here for reference). However, character sprites in the world often have much more "chibi" proportions, with bigger heads and smaller bodies. Keeping this in mind, we draw an outline for a simple world sprite for Wraithand. | ||
| + | <gallery widths="288" heights="288"> | ||
| + | File:CB wraithand world sprite 01.png|The world sprites can be very simple. | ||
| + | </gallery> | ||
| + | |||
| + | ==== 2: Outline and Size ==== | ||
| + | '''As a rule, the "world sprites" are roughly 50% of the scale of battle sprites''' - you can get a good indication of how big a monster's world sprite should be by shrinking its battle sprite down by half (which we have done here for reference). However, character sprites in the world often have much more "chibi" proportions, with bigger heads and smaller bodies. Keeping this in mind, we draw an outline for a simple world sprite for Wraithand. | ||
| + | <gallery widths="288" heights="288"> | ||
| + | File:CB wraithand world sprite 02.png|Coloured in and ready to go! | ||
| + | </gallery> | ||
== Step 4: Animation & Tagging == | == Step 4: Animation & Tagging == | ||
== Step 5: Exporting & Sprite Sheets == | == Step 5: Exporting & Sprite Sheets == | ||
Revision as of 13:24, 15 May 2023
This article is part of a series of tutorials intended on teaching the reader how to create their own monster mods for the PC versions of Cassette Beasts. We advise the reader familiarise themselves with the Mod Developer Guide first.
This part will focus on concept art, pixel art and animating a monster. As we go, we will be designing a monster from scratch.
- Monster Making Guide Part 1: Concept, Art & Animation
- Monster Making Guide Part 2: Implementation & Stats
- Monster Making Guide Part 3: Integration
Step 1: What You'll Need
Before we start, you will need the following pieces of software:
- Aseprite or Libresprite: These are both pixel art programs that excel in creating pixel art assets and can export the frame data necessary to be read by Cassette Beasts. Aseprite is a premium software package but Libreoffice is a free alternative.
- Godot 3.5.1: As explained in the Mod Developer Guide, this editor is necessary for editing configuration files for implementation.
- A text editor: This is to import and edit .CSV files, which is how you will create your monster's names and bestiary text. We use LibreOffice, which is free.
- An audio editor (optional): This is to create a battle cry for your monster. We use Audacity, which is free and open-source, and very easy to use.
- A digital art program (optional): This is useful for concept art and also creating the "monster sticker". We use Photoshop, but free alternatives include Paint.net, Krita and GIMP.
There is enough free options here that it doesn't have to cost you anything to begin modding!
Step 2: Concept & Creation
Designing your Monster
Whilst you are free to design a monster directly as a sprite, we recommend concepting your monster on paper or digitally first.
It's much easier to design a solid sprite if you have concept art to work from.
- Think about what role you want your monster to have in the game, and how you would want it to act.
- Consider what elemental type it would.
- Consider what moves it would use in battle.
Shape
The shape and silhouette of your monster are important in distinguishing them. For this guide, we're going to use a monster we are going to call Wraithand. Wraithand is a ghostly astral-type creature with a big hand for a tail. Wraithand started as a pencil sketch that was painted digitally after scanning.
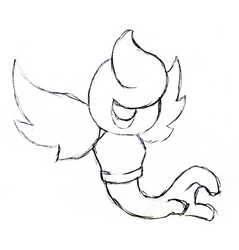
Lineart

Coloured


Colours
Cassette Beasts uses a very limited colour palette for its monsters - this helps them feel more like a "set" when displayed together. You don't have to use these colours when drawing concept art, but it is helpful!
Here is an image for all of the colours we use for monster sprites - You don't have to follow these exact rules (and not all of our monsters do) but it is a useful reference:
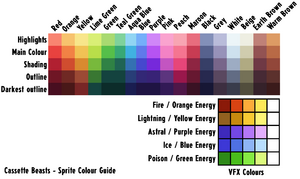
Cassette Beasts Palette Guide (click to expand)

You will also notice that our monsters generally have one level of shading and occasional highlights, and are drawn assuming that light is being cast from the top-right of the sprite.
Cassette Beasts Monster Design Rules (Optional)
As a mod creator, you are free to design whatever you please - your monster forms don't even have to be monsters! However, if you are interested in designing a monster that matches the aesthetic of the existing monsters in the base game, there are some Do's and Don'ts we created in order to keep our monsters on the right path. Feel free to follow them if you wish!
| + Do feel free to design monsters that are as cute or as creepy as you want! |
| + Do try to make a design with a distinct silhouette and personality |
| + Do try and make a design that fits an elemental type, even if only lightly |
| + Do think about how this monster would attack |
| + Do give them an exciting pose that they’ll be seen in as a sprite |
| - Don’t make them overdetailed: larger monsters can afford to be more detailed, but in general pixel art restricts too much detail on characters. |
| - Don’t design monsters too close to existing characters, or direct parody characters |
| - Don’t begin and end at “elemental animal” for your design inspiration |
| - Don’t design monsters that are sexually explicit |
| - Don’t design monsters that are too violent or disturbing |
| - Don’t design monsters with a “human” skin tone or defined ethnicity |
| - Don’t design monsters that are culturally insensitive or appropriative |
Step 3: Creating your Sprite
Palettes
You can import this PNG file into Aseprite or Libreoffice to generate a palette.
Drawing your Battle Sprite
1: Finding the right size
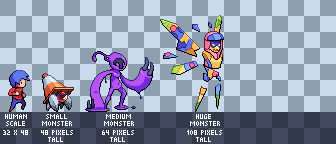
A comparison of various battle sprites for Cassette Beasts (click to expand)
It's important to think about how big you want your monster to be in the world of Cassette Beasts. As a house rule, all monster sprites are either the same size or bigger than the game's human sprites. For Wraithand, we're going to make it approximately "medium size", and try and fit it within a 64x64 pixel grid.
Remember: the bigger the sprite, the harder it will be to animate, so try and keep the sprite as small as you can get away with without losing too much detail!
Our first step will typically be to shrink our concept art to the pixel art scene to see what size fits.
This size looks good!
2: Defining the Outline
After shrinking the concept art and deciding on the size of the sprite, we're going to trace our own art! Turning the reference art transparent, we'll define the outline of our sprite. Feel free to adjust the details as you go.
We just need a single colour outline for now.
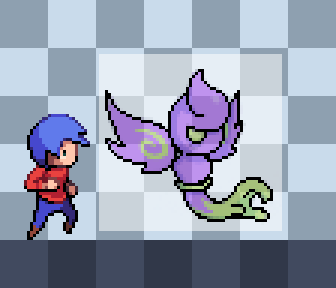
3: Filling in the Shading
Now we have the outline (and still have the concept art visible) we fill in the shading and any details (like the swirls on the wings). We also use darker shade pixels on parts of curves to help define their round shape further - this is called "anti-aliasing" and is a common technique in pixel art!
We start the colouring with the shaded bits.
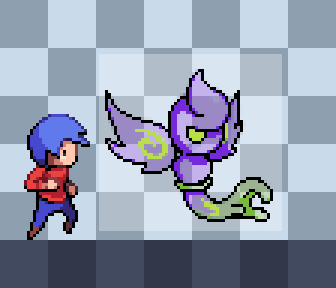
4: Filling the Colours
Hiding our concept art layer, we now fill in the rest of the colours. We're still adjusting the sprite as we go - for example, adding the side of the left eye in to help define the shape of face.
The sprite is coloured in with the main body colours.
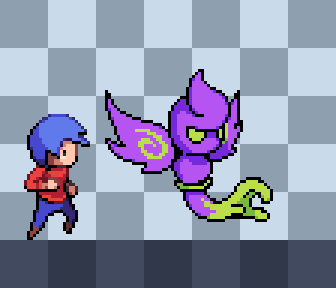
5: Colouring the Outline
The final step is to colour in the outline. Cassette Beasts has a generally consistent rule with outline colours:
- The underside of the outline is always black, as are parts around shaded areas.
- The parts of the outline that are "facing" the top right (the light source) are shaded in the 4th shade on our palette, the "Outline" tone.
- Parts that are facing upwards/not in the shade but are not pointing in the direction of the "light source" use the 5th shade, the darkest tone.
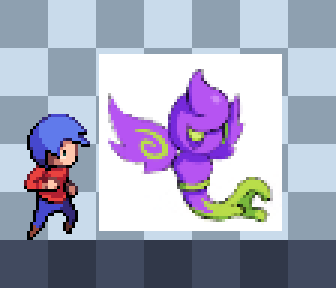
Following these rules we complete the rendering of our sprite! It's simpler than you'd think!

The sprite is now fully rendered!
World Sprite (Optional)
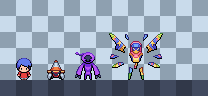
A comparison of various world sprites for Cassette Beasts (click to expand)
If you want to also design a roaming world monster to add into the game, the process is a lot simpler than the battle sprites! Of course, not every monster in Cassette Beasts has a "world sprite" so this isn't necessary.
1: Outline and Size
As a rule, the "world sprites" are roughly 50% of the scale of battle sprites - you can get a good indication of how big a monster's world sprite should be by shrinking its battle sprite down by half (which we have done here for reference). However, character sprites in the world often have much more "chibi" proportions, with bigger heads and smaller bodies. Keeping this in mind, we draw an outline for a simple world sprite for Wraithand.

The world sprites can be very simple.
2: Outline and Size
As a rule, the "world sprites" are roughly 50% of the scale of battle sprites - you can get a good indication of how big a monster's world sprite should be by shrinking its battle sprite down by half (which we have done here for reference). However, character sprites in the world often have much more "chibi" proportions, with bigger heads and smaller bodies. Keeping this in mind, we draw an outline for a simple world sprite for Wraithand.
Coloured in and ready to go!